Building for the Web 🟡
Warning
First iterations of this guide did not include instructions for web builds, hence this appendix. In the latest ongoing wave of upates, web builds are directly supported in the main part of the guide, so this appendix will shortly feel outdated and eventually be removed.
Resulting code: step095-emscripten
Even if this guide focuses on native application development, a nice byproduct of using WebGPU it to be able to compile our code as a Web page.
In such a case, we no longer need a distribution (wgpu-native or Dawn), we rather have the compiler map our calls to WebGPU symbols to calls to the actual JavaScript WebGPU API.
Build system
Emscripten toolchain
Building C++ code into a web page requires a specific compiler that can target WebAssembly instead of native binaries. The typical choice is Emcripten, and I invite you to follow the installation instructions.
Open a terminal and activate emsdk (see installation instruction), such that the command emcmake is available in the PATH (you may check with where emcmake on Windows which emcmake on others).
Dependencies
Although the emcmake command we use below does a lot to make our transition to a web build seamless, we should slightly alter our CMakeLists.txt before running anything, in order to add some web-specific options.
Emscripten provides its own version of GLFW, because drawing on a Web page is very different from drawing on a native window. We thus tell CMake to include our own glfw directory only when not using Emscripten:
if (NOT EMSCRIPTEN)
    # Do not include this with emscripten, it provides its own version.
    add_subdirectory(glfw)
endif()
Other dependencies (webgpu, glfw3webgpu and imgui) are not affected or already handle Emscripten internally.
However, in order to have Emscripten use its own GLFW when linking the application, we must tell it to use the -sUSE_GLFW=3 argument. We also use -sUSE_WEBGPU to tell the linker that it must handle WebGPU symbols (and replace them with calls to the JavaScript API):
# At the end of the CMakeLists.txt
if (EMSCRIPTEN)
    # Add Emscripten-specific link options
    target_link_options(App PRIVATE
        -sUSE_GLFW=3 # Use Emscripten-provided GLFW
        -sUSE_WEBGPU # Handle WebGPU symbols
        -sASYNCIFY # Required by WebGPU-C++
    )
endif()
Note
The -sASYNCIFY option is needed when using Instance::requestAdapter or Instance::requestDevice in the wrapper. It makes these functions work as sync operations while in JavaScript they are async (which would require one to write our whole application in callbacks).
A last change to the CMakeLists.txt before we can build: by default Emscripten generates a WebAssembly module, but not a web page. In order to get a default web page around it, we must change the extension of the App target to .html:
# in the 'if (EMSCRIPTEN)' block:
# Generate a full web page rather than a simple WebAssembly module
set_target_properties(App PROPERTIES SUFFIX ".html")
Note
We see below how to customize the HTML part of this web page (a.k.a. the shell).
Configuration
We are now ready to configure our project using emcmake. This is a command provided by Emcripten to ease the compilation of CMake-based into WebAssembly. It must simply be used as a prefix of the cmake configuration call:
# Create a build-web directory in which we configured the project to be built
# with emscripten. You may use any regular cmake command line option here.
emcmake cmake -B build-web
Note
Prefixing with emcmake is only needed for the first call to CMake. Relevant information are then properly stored in the CMakeCache.txt, such that you can use CMake as usual afterwards.
Note however that it won’t correctly run as is, we need to change a few things in the CMakeLists.
Build
Building the project is then simply the following, as usual with CMake:
cmake --build build-web
Run
Once the build is ready, it creates an App.html page. In order to circumvent browser safety rules, you must not open it directly but rather run a local server, for instance using Python:
python -m http.server -d build-web
You may now browse to http://localhost:8000/App.html! Note that only Chromium/Google Chrome has WebGPU support enabled for now.
Important
At this stage, the project should build successfully, but the web page will not run correctly.
Code changes
Get limits
The first error we face (as of September 4, 2023) is a missing feature of Chromium:
Aborted(TODO: wgpuAdapterGetLimits unimplemented)
No choice here, we must hard-code some values. We only use supported limits for the two “min” limits. Turns out that according to web3dsurvey, setting them to 256 enables us to support 99.95% of users!
SupportedLimits supportedLimits;
#ifdef __EMSCRIPTEN__
// Error in Chrome so we hardcode values:
supportedLimits.limits.minStorageBufferOffsetAlignment = 256;
supportedLimits.limits.minUniformBufferOffsetAlignment = 256;
#else
m_adapter.getLimits(&supportedLimits);
#endif
WGPUSupportedLimits supportedLimits;
#ifdef __EMSCRIPTEN__
// Error in Chrome so we hardcode values:
supportedLimits.limits.minStorageBufferOffsetAlignment = 256;
supportedLimits.limits.minUniformBufferOffsetAlignment = 256;
#else
wgpuAdapterGetLimits(m_adapter, &supportedLimits);
#endif
Note
The WebAssembly module may be cached by your browser, so when reloading the page use Ctrl/Cmd+F5 instead of just F5.
Resources
The next issue we face occurs when trying to create our render pipeline:
Failed to execute 'createRenderPipeline' on 'GPUDevice'
If you pay attention to the log lines above, you may see that the shader module is set to a null value: <wgpu::ShaderModule 0>. Indeed, the program has no way to access the shader on your local file system!
Fortunately there is a way to tell Emscripten what data to package together with the WebAssembly module. We thus add a new option to the target_link_options line of the CMakeLists:
target_link_options(App PRIVATE
    # [...]
    --preload-file "${CMAKE_CURRENT_SOURCE_DIR}/resources"
)
This makes the content of the resource directory available to the Web page.
Warning
The whole content of the resource directory will be downloaded by your end user. Make sure to only include what is needed here so that your web page is not too heavy! You may instead enumerate the required files individually.
Maximum memory
We are now facing an out-of-memory (OOM) error:
Aborted(Cannot enlarge memory arrays to size 16953344 bytes (OOM))
As detailed in the error message, a WebAssembly module only gets a limited amount of memory by default. We may either increase this default amount, or allow the browser to incrementally allocate more memory as it gets needed. We go for the second option here as we did not settle for a specific use case.
Once again, it is solved by an extra linker option:
target_link_options(App PRIVATE
    # [...]
    -sALLOW_MEMORY_GROWTH
)
Main loop
Now the application gets initialized correctly, but after stalling a little bit and displaying a first frame, it fails again:
Aborted(wgpuSwapChainPresent is unsupported)
This actually hides a more general issue of Emscripten-built applications: it is not possible to have an explicit main loop!
A web application must not stall the browser in which it is running, so it cannot just loop forever. Instead in JavaScript one typically uses requestAnimationFrame to have the browser call the body of the main loop at each frame.
When building C++ code using Emscripten, the later provides in the emscripten/html5.h header some utility functions interfacing with the browser’s animation frames.
We use in particular emscripten_set_main_loop_arg, which acts like a main loop except the body of the loop is given by a function pointer:
// Signature provided by html5.h:
void emscripten_set_main_loop_arg(
    em_arg_callback_func func,
    void *arg,
    int fps,
    int simulate_infinite_loop
)
The type em_arg_callback_func is a function pointer taking a void* as argument and returning nothing. Like raw WebGPU callbacks, this void pointer is just a blind forwarding of the void *arg argument, which we can use to pass any data to the body.
In our case, we use this arg user pointer to pass a pointer to the application:
emscripten_set_main_loop_arg(
    [](void *userData) {
        // Cast the blind user data into the Application object it actually is
        Application& app = *reinterpret_cast<Application*>(userData);
        app.onFrame();
    },
    (void*)&app, // value sent to the 'userData' arg of the callback
    0, true
);
Note
The func argument can be given as a C++ lambda only if it is not capturing any variable. This is why we need to use arg.
In the end, our main.cpp file remains rather simple:
// In main.cpp
#include "Application.h"

#ifdef __EMSCRIPTEN__
#include <emscripten/html5.h>
#endif

int main(int, char**) {
    Application app;
    app.onInit();

#ifdef __EMSCRIPTEN__

    emscripten_set_main_loop_arg(
        [](void *userData) {
            Application& app = *reinterpret_cast<Application*>(userData);
            app.onFrame();
        },
        (void*)&app,
        0, true
    );

#else // __EMSCRIPTEN__

    while (app.isRunning()) {
        app.onFrame();
    }
    app.onFinish();

#endif // __EMSCRIPTEN__

    return 0;
}
As for the initial issue of the swap chain, we may simply ignore the call to wgpuSwapChainPresent in the emscripten version:
// In Application::onFrame()
#ifndef __EMSCRIPTEN__
    m_swapChain.present();
#endif
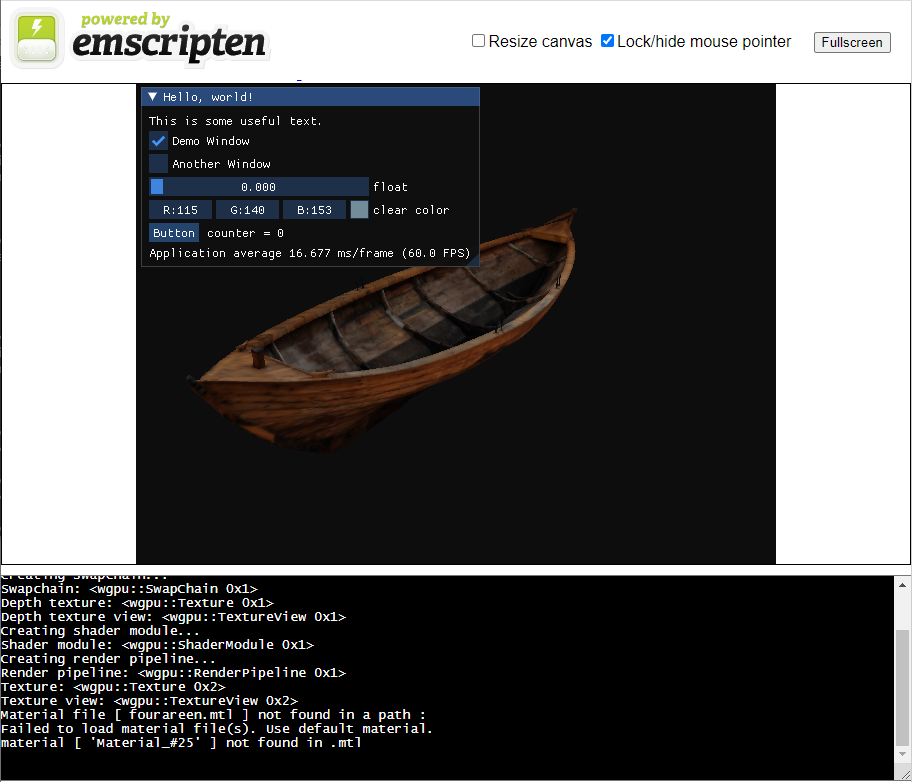
Our interactive application, finally running in the browser.
Bonus: Shell
If you want to change the HTML template in which Emscripten wraps your application, you can specify yet another link option to set a shell file: --shell-file.
For instance download shell_minimal.html from Emscripten’s repository.
I also add in the snippet below a LINK_DEPENDS property to the App target that ensures that whenever the shell file is edited, the build systems knows that it must re-link the app (even if nothing changed in the code).
# (In 'if (EMSCRIPTEN)')
set(SHELL_FILE shell_minimal.html)

target_link_options(App PRIVATE
    # [...]
    --shell-file "${CMAKE_CURRENT_SOURCE_DIR}/${SHELL_FILE}"
)

# Make sure to re-link when the shell file changes
set_property(
    TARGET App
    PROPERTY LINK_DEPENDS
    "${CMAKE_CURRENT_SOURCE_DIR}/${SHELL_FILE}"
)
Conclusion
You are now able to port pretty much any step of this guide! There are also many advanced options of Emscripten that you can explore, but I do not detail them here because they are not specific to WebGPU.
Resulting code: step095-emscripten